
 |
| (click to enlarge) |
August 19, 2012
March 14, 2012
Timber Wolf
Timber Wolf alias Brin Londo of the Legion of Super-Heroes from classical DC era, Reboot Legion and Threeboot Legion.


please click to enlarge
December 23, 2011

February 7, 2011
Huntress

from left to right:
Helena Bertinelli 2006 / 2003 / Year One 2008 / 1996 / Helena Wayne 1977 / Helena Bertinelli, First Appearance 1989 / 1989 / 1992
November 20, 2010

April 19, 2010


December 15, 2009

March 28, 2009
The Emerald Legion
Some pictures I made while ago:
The Legion of Super-Heroes when the Legionnaires had been posessed by the Emerald Eye

Shrinking Violet, Element Lad, Saturn Girl, Lightning Lad, Cosmic Boy

Star Boy, Spark (Lightning Lass), Invisible Kid, XS, Mon-el, Brainiac 5

Shrinking Violet (colour variant), Ultra Boy, Triad (Triplicate Girl), Chameleon Boy
 This emerald version of the legion appeared only twice (in Legion of SH 84 and Legionnaires 40) in 1996.
Back then I was so amazed by the attuned design of the costumes that I made my templating within only three nights.
Two excerpts from these books:


A pity, that the page from LSH on the right was coloured only in one shade of green.

The Legion of Super-Heroes when the Legionnaires had been posessed by the Emerald Eye
Shrinking Violet, Element Lad, Saturn Girl, Lightning Lad, Cosmic Boy
Star Boy, Spark (Lightning Lass), Invisible Kid, XS, Mon-el, Brainiac 5
Shrinking Violet (colour variant), Ultra Boy, Triad (Triplicate Girl), Chameleon Boy
 This emerald version of the legion appeared only twice (in Legion of SH 84 and Legionnaires 40) in 1996.
Back then I was so amazed by the attuned design of the costumes that I made my templating within only three nights.
Two excerpts from these books:


A pity, that the page from LSH on the right was coloured only in one shade of green.
May 11, 2008

January 11, 2008

July 11, 2007
Donna Troy
Donna Troy as Wonder Girl, Troia, a Darkstar, a Black Lantern, a White Lantern and Wonder Woman.

January 11, 2006

July 19, 2005

August 17, 2004

September 12, 2000
Figure Mania: Card Board Figures
General information:
Quality:
The figures are laser printed on 300 gram card board with 600 dpi. Cutting is done with a plotter.
Their height is approximately between 2.7 and 2.9 inches.
They are printed only on one side. The backside is white.
The plastic standees for the figures are included in the delivery.
Shipping costs for registered mail:
worldwide: 18.00 USD
Payment: via Paypal
Production and Shipping time:
Production time may take some weeks
How to order:
- Please send me the set codes via facebook messenger, what sets you would like to order.
- Next I will send you an information about the total price including shipping costs.
- If you agree you may send me your e-mail and shipping address. To finalize everything I will send an payment inquiry via paypal.
- After the payment I will send off the figures within 2-3 working days. You will receive the tracking numberof the package.
July 8, 2000
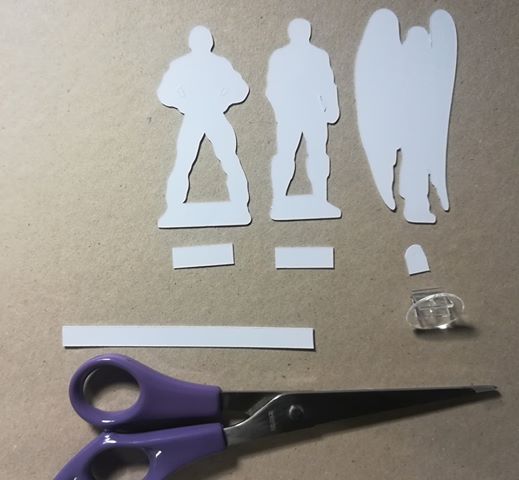
Info about plastic standees
The plastic standees, that will hold your card board figures, don't have always the same exact width.
Thus I add some card board stripes to the shipping.
If the figure is too lose in the standee, please add a little strip in the back of the bottom of the figure.
Please cut these stripes to the appropriate wideness of the figure base and put both (figure and stripe) carefully into the plastic standee. (The additional small stripe should be on the back of the figure to not cover any printed part.)
I also add some miscut figures to your shipping, so that you can first experiment with it. Actually it is not that hard or complicated.
 |  | |||
| Cutting stripes to smaller pieces | stripes put together with figures into bases |
July 6, 2000

July 7, 1990
Creating Templates
There are definitely various ways to create templates. This is just my way to do it.
This is just an example and a description how I make mine with the help of other artwork.
 1. Scanning
I scan the original artwork, I'd like to create an template from.
In this example it's Element Lad by Ron Frenz.
1. Scanning
I scan the original artwork, I'd like to create an template from.
In this example it's Element Lad by Ron Frenz.
 2. Change of Colours
First the scanned picture is turned into a grey-scaled picture.
Then back into a RGB- or CMYK-mode.
The grey colours are turned into blue and the brightness is encreased.
Finally this version is printed out.
2. Change of Colours
First the scanned picture is turned into a grey-scaled picture.
Then back into a RGB- or CMYK-mode.
The grey colours are turned into blue and the brightness is encreased.
Finally this version is printed out.
 3. Drawing
On the print-out I draw directly the outline of the template with black.
3. Drawing
On the print-out I draw directly the outline of the template with black.
 4. Second Scanning
The print-out with the black outline is scanned and the blue shaded pixels are erased.
The different dark grey/black pixels are all coloured to one 100% black.
4. Second Scanning
The print-out with the black outline is scanned and the blue shaded pixels are erased.
The different dark grey/black pixels are all coloured to one 100% black.
August 8, 1989
Creating the Characters by using Templates

1. Print Out
I'm printing out the templates in a light blue.
Several images can be put next to each other.
 2. Drawing Details
On the printed templates I am drawing the details of each figure.
First with a pencil, then with a black or red pen.

3. Scanning & Colour Erasing
The drawing is scanned and the white parts are
marked by a colour mask and are erased.
I use different layers:
Layer 1 with the original template,
layer 2 for the scan with hand-drawn details
I can adjust layer 2 according to the blue
outline onto the template of layer 1.
Now the blue parts on layer 2 can be erased.
 Finally the different grey and black shaded
 pixels are all coloured to 100% black.

4. Colouring
The fillings are done on a third layer.
5. Shading
Same about shading:
new layer with a certain translucency.
I usually use different layers
for shading on black and other
colours.
(e.g. dark blue shade on black /
black lucent shade on purple /
light blue shade on white)
6. Scaling Down
Before uploading the picture to this
blog I resize it to approx. 10%
Subscribe to:
Comments (Atom)